What is a build?
A build takes your code and makes it into something useful.
There are certain requirements to making a build work.
A few years ago, before Docker, Vagrant, and DevOps, there would be several requirements to successfully build your software; these requirements would generally be on an outdated wiki page somewhere, or more likely in one person’s head, and that person would likely be on vacation. Building would be painful, error-prone, and take hours, because dozens of requirements had to be just right in order for your build to work.
Before DevOps, building the Jekyll site on which we are working (taking the code and making a website with it) would require Ruby, Jekyll, something called execjs; Nginx or some other webserver; you would have to set permissions correctly; every one of these pieces of software would have to be of a certain version in order to work, and then the entire thing would only work on certain operating systems (trying it on a Mac, for example, would typically require foraging through forum posts).
Now that we know Docker, building is fast, easy, reliable and predictable: the only requirement for us is Docker. If you have Docker installed (for example on your CoreOS virtual machine), your build will always act exactly the same way, which is good (this does not mean there will never be any bugs; it does mean that if you experience a bug, there is a good chance that everyone else is too).
What is continuous integration?
It turns out that it is extremely useful to build your software often, ideally every time a change is introduced–even a minor one.
The practice of continuous integration automates the build process: as soon as a change is detected to your code (for example the Jekyll site we are creating), a continous integration server (this is less scary than it sounds, you can use a free existing server, as we will do later on) tries to create a build, and that attempt is marked as either a success of a failure.
You should be able to know at any time the state of your project: when the last build was attempted, and whether it succeeded or failed. This information will guide you in your development. Any failure should be fixed immediately before doing anything else; everything should be done to keep your project in a passing state.
In addition to building your project, your continuous integration server can run automated tests on it to make sure functionality works as expected, thus preventing regressions: features which you remember working at some point but which are no longer working. In our upcoming class on automated testing, we will set up some automated tests for your projects, and your continuous integration server will run them.
Setting up a continuous integration (CI) server
A CI server is not that hard to set up, but it can take half a day; and we’d rather be doing fun stuff. Therefore we will be using one of the online CI servers, Circle CI, which takes minutes to set up.
Circle CI is free to use for open-source projects hosted on GitHub. We’ll talk more about open source in our class about the developer community, but in a nutshell open-source software is free to use and free to modify; so if you are putting anything on your free GitHub account, you retain ownership but not the copyright.
Since the beginning of this course, you have been using GitHub to host your project website and code, for free. In exchange for it being free, you are providing your code (your blog and your content) for free to world to use and to modify, and to integrate into their own projects. This means that if you keep developing your blog using the techniques we are learning in this course, someone might take one of your texts and integrate them into their own site, and they would be allowed to do so.
CircleCI is free to use for open source as well. The business model of these companies is to get you used to their products, and charge you a fee when you want to use them for proprietary (or non-open-source) software.
Start by heading to the Circle CI website and click “Sign up free”.
CircleCI is tightly integrated into GitHub, so you won’t have to open a separate account on CircleCI: use your GitHub account to log in.
You’ll have to tell GitHub that you authorize CircleCI to manage your account, and then you’ll find yourself on your CircleCI dashboard.
Once there, start by clicking on your account name, then choose your project. If your project is a fork of another project (which it will be if you followed the examples in your class), you will have to click “show forks”.
In this example the user dave376 is selecting his project mushroom-identifier, which is a fork of someone else’s project:
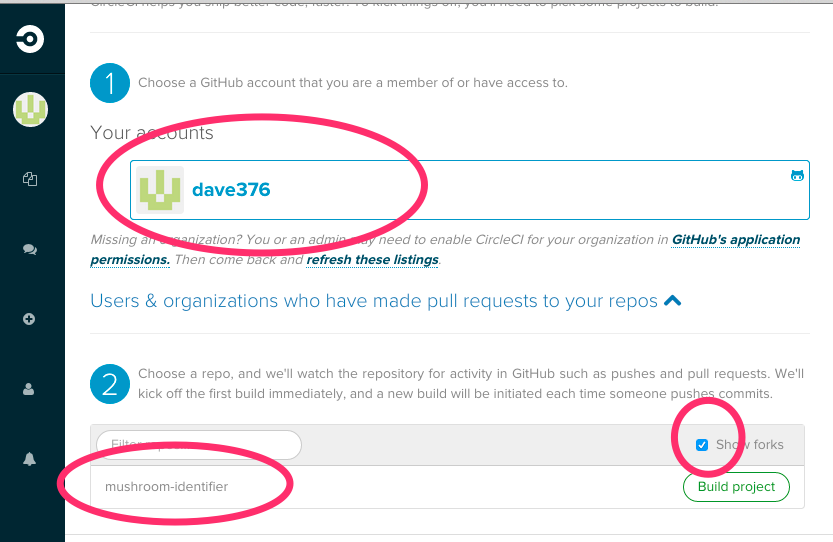
Click the Build project button, which will launch the build for your project.
On the ensuing page, after 30 seconds or so, Circle will give you the state of the build: No Tests. This is because Circle does not know what to do, does not know what the requirements are to build your project.
Setting up your project to be tracked by the CircleCI continuous integration server
Every continuous integration server has a different file it needs to tell it what to do in order to build your project. In the case of CircleCI, it needs a file called circle.yml. Create it at the root of your project, on your computer. Because we are using Docker and DevOps best practices, the requirements to build our project are simple: only Docker is required.
To test that our code makes sense, we must build the docker machine, using the ./scripts/dev.sh, which we’ve used previously. To tell CircleCI that this is what needs to be done to build and test our code, create a file called circle.yml at the root of your project, it should contain:
dependencies:
  pre:
    - sudo curl -L -o /usr/bin/docker 'http://s3-external-1.amazonaws.com/circle-downloads/docker-1.6.0-circleci'; chmod 0755 /usr/bin/docker; true
    - sudo service docker start

test:
  override:
    - ./dcycle/deploy.sh -p80 -etest
Once you added this file (with git add), committed your change and pushed it back to GitHub, within minutes you will have a passing build on your CircleCI dashboard:

To see what a failing build looks like, introduce an error into your _config.yml file: change title: to title without the colon. This is an error and your build should fail.

Fix your error (put back the colon after title), push your commit, wait a bit, and now you should see that your build is “Fixed” again.
Conclusion
We just saw a very simple, but very powerful, implementation of continuous integration. Starting now, you are in a position to formally guarantee that your code is in a passing state. And if it’s not, you will know when it broke and what broke it, so you’ll be able to fix it that much quicker.